How to Read a Cross Stitch Pattern
On a cross stitch pattern, each square of the grid is one stitch on your fabric, and each symbol tells you which thread color to use there. The color key matches every symbol to a floss number. Bold lines every ten squares help you count, and arrows on the edges mark the center, where most stitchers begin.
In this guide
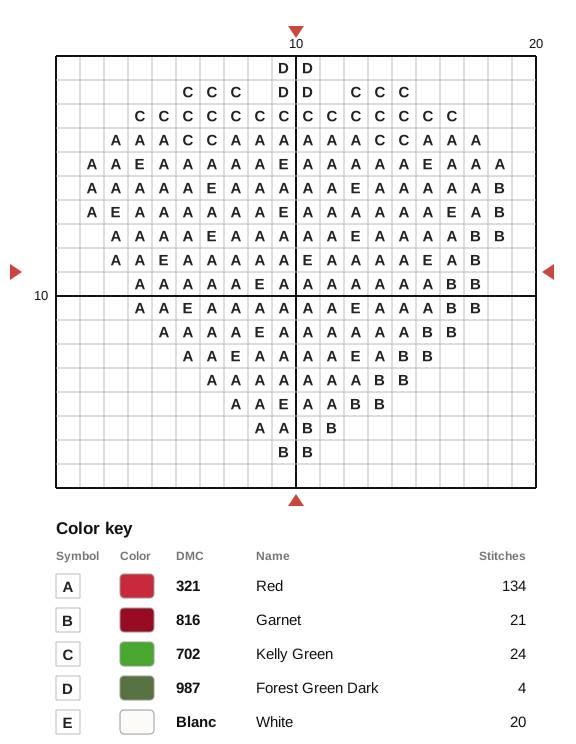
A cross stitch pattern (also called a chart) looks busy at first, but it only uses a few simple ideas. Once you know them, you can pick up almost any pattern and start stitching. We will use the little strawberry chart above as an example — the same layout you will find in the PDFs of our free cross stitch patterns.
The grid: one square, one stitch
Every square on the chart stands for one full cross stitch on your fabric. On Aida, one square of the chart is one square of the fabric. A chart that is 20 squares wide and 18 squares tall will be 20 stitches wide and 18 stitches tall when you stitch it.
Empty squares are left unstitched. The fabric shows through there, so the color of your Aida becomes part of the design. On our strawberry, the white around the berry is simply fabric.
Symbols and the color key
Each symbol stands for one color of thread. In the strawberry chart, A is red, B is a darker garnet for the shady side, C and D are two greens for the leaves and stem, and E marks the little white seeds.
The color key (sometimes called the legend) is the list that tells you which thread each symbol means. A typical key has:
- Symbol — the mark used on the chart.
- Color swatch — a preview of the shade. Printers and screens are never exact, so trust the number, not the swatch.
- Floss number — for example DMC 321. This is what you buy or pull from your stash.
- Name — such as “Red” or “Forest Green Dark”.
- Stitch count and sometimes skeins — how much of each color the design uses, so you know how much thread to buy.
Most patterns sold in the US and Europe list DMC numbers. If you use another brand, look for a conversion chart for that brand.
Tip: Before you start, make a floss card: punch holes along a strip of card, tie a short length of each color through a hole and write its symbol and number beside it. You will never mix up two similar reds again.
Bold lines every ten squares
Look at the strawberry chart again: every tenth line is thicker. These ten-lines split the chart into blocks of 10 × 10 stitches, which makes counting much easier. Instead of counting 17 squares from the edge, you can count “one block, then seven more”.
Many stitchers also run a fine gridding thread through their fabric every ten holes, matching the bold lines. It is pulled out once the design is finished.
Row and column numbers
Numbers along the top and left edge label the ten-lines: 10, 20, 30 and so on. They help you find your place, and on large patterns they tell you which part of the design you are looking at. In our PDFs the numbers continue across pages, so column 50 is always column 50, whichever page it appears on.
Center arrows: where to start
Small arrows on each edge of the chart point to the middle row and the middle column. Where those two lines cross is the center of the design.
To start in the center:
- Fold your fabric in half and then in half again, and pinch the folds. The point where they meet is the center of the fabric.
- Find the center of the chart by following the arrows.
- Make your first stitch there, in whatever color the chart shows at that spot (or the nearest stitched square).
Starting in the middle means the design ends up evenly placed on the fabric, with the same margin on every side for framing. On the strawberry, the center falls in the middle of the red berry.
Charts that span several pages
Large patterns do not fit on one sheet of paper, so they are split across pages. Look for:
- A page map — a small diagram showing how the pages fit together. In our PDFs it is on the cover.
- Overlapping rows — a couple of rows or columns at the edge of a page are repeated on the next one so you can line them up. Our charts shade the repeated squares in gray, so you don’t stitch them twice.
- Page numbers or “Part 2 of 4” at the top of each chart page.
Some stitchers tape the pages together into one big chart; others keep them separate and work one page at a time.
Black-and-white or color charts
A black-and-white symbol chart shows only the symbols. It is easy to read, prints cheaply and is the most reliable way to tell colors apart.
A color chart fills each square with its thread color and adds the symbol on top. It gives you a quick sense of the picture, which helps when you are working on large areas of one color. Many people use the color version for an overview and the black-and-white one for counting.
Other marks you may see
Our free patterns use only full cross stitches, but patterns from other designers may include:
- Straight lines between squares for backstitch — outlines and fine details stitched after the crosses.
- Small dots or circles for French knots — see our guide on how to do a French knot.
- Triangles or half-filled squares for fractional stitches, such as half or three-quarter stitches.
The key will list each of these, usually with the number of strands to use.
Strands and fabric count
The key or the cover usually tells you how many strands of floss to use. On 14 count Aida, two strands for cross stitch is standard. The cover also lists the finished size, which depends on the fabric: the same chart stitched on 18 count fabric comes out smaller than on 14 count, because there are more stitches per inch.
Practice with a real chart
The best way to learn is to try it. Download any of our free Christmas cross stitch patterns — the little tree or wreath designs are small enough to finish over a weekend — or turn your own photo into a chart with the free Pattern Maker. New to stitching altogether? Start with our guide on how to cross stitch for beginners.
If you would like to get a feel for working square by square before you buy any supplies, you can also stitch on your phone with Cross Stitch Master: pick a color, tap the grid and watch the picture fill in.